tinyⒶllotment

Growing as much food on as little land for as little money as possible


3 Comments

Things are looking good in the dome.

Despite the fact that I have done nothing in the dome over the winter things are happening all on their own.

The passion fruit is in flower and I have noticed dozens of fruit forming.

I have also noticed something interesting happening in the center the kiwi fruit flowers. I really hope we have kiwi fruit this year.

2017-05-04 08.55.44

The olive is in full flower and the fig trees are looking good. Hopefully we will get more figs this year.

2017-05-04 08.56.05

I have neglected the allotment over the last few months due to pressures at work etc but I am planning on spending the weekend there sorting it out.

We are not going to be growing an awful lot this year as we just don’t have the time but I am going to see if I can complete the fence and build some more beds for next year and sort the paths out so I can reduce maintenance.

More soon

Paul


5 Comments

Drone flight over the Geodesic Dome

As I mentioned in a previous post my friend Neil came over a couple of weeks ago with his drone to take some footage of the Geodesic Dome and the surrounding allotments. Here is the footage he shot that day after some editing and some rather pleasent and fitting music was added. Ignore the idiot with the hat!

Great job Neil.

He is going to come over a few times throughout the season to chart our progress with the project.

If you would like a dome like this in your garden or allotment we are now producing them as a kit. Please call Paul on 07796890337 to discuss options.

More soon


4 Comments

Dome plot starting to come together.

But still so much to do.

I have started work on the fence going around the dome plot. I decided to carry on the triangle theme to mimic the bottom layer of the geodesic dome structure. I used the same size material. this will have chicken wire stapled to the face of it and then a capping rail will go along the top. I have built the front side and still have three sides to go but they should not take too long as I kinda know what I am doing now.
If you remember, this is what it looked like before.

2016-02-282010-05-23_zpszkymk0ew

And this is what it looks like now

2016-03-132017-25-06_zpsmmlvphpv

I have also started building the beds in the corners of the plots at the dome end. We are going to have a bark chipping path going right around the dome for easy maintenance.

2016-03-20 17.56.18_zpsgnmfrrkc

We have planted another couple of apple trees in what is to become our edible forest garden. This area will be planted with an understory of soft fruits like blueberry and then a herbaceous layer, ground cover and  vines. I would also like to have fungi in this area as well. It doesn’t look like much at the moment but in a couple of years it will be a very productive but low maintenance area.

2016-03-132017-42-58_zps3husoy2m

Inside the dome we have build a temporary staging so we can start sowing seeds and we have progressed slightly with the aquaponics system. We have filled the fish tank with water and so far there are no leaks and I have built and tested a siphon system to drain the grow beds.
The aquaponics system we are building initially will be a simple “flood and drain” system. The pump will be in the fish tank and will constantly pump water up into the grow beds. The plants will not survive long if their roots were constantly immersed in water so you need to drain the beds on a regular basis. Using a simple siphon it is possible to completely drain the beds without having to use any moving parts such as valves etc.
The beds slowly fill up with water until the water level reaches the top of the siphon it starts tricking out of the drain and back into the fish tank but as the flow increases it begins to siphon and drains all the water back into the fish tank. The beds should drain as quickly as possible as this will both draw oxygen down into the grow media and also introduce oxygen to the fish tank.
I was going to build a “bell siphon” as these are the most common but I recently saw a video on youtube that introduced the “U siphon” to me and it was so simple I decided to build one of those instead. Here is the video where I first saw the U siphon.

And here is my first attempt at building one.

I just built it in a bucket for now so I could quickly test it without having to wait for the whole grow bed to fill up each time.
As you can see it works perfectly but it will take a little bit of tweaking matching the siphon to the pump but that will be another day.

More soon


6 Comments

Interesting weekend at the dome plot.

Spent most of the weekend on the dome plot but because the weather was so nice I decided to work outside and try and sort out the small plot of land that surrounds the dome. I wanted to tidy up the perimeter of the plot as it is a mess and impossible to maintain without spraying with chemicals. I needed to replace the old fence with something that was easy to strim up to and would also form the outer edge of no dig beds. I found someone who needed to get rid of some scaffold boards as they were taking up space so I got them up the the plot. I was in the process of giving the boards a coat of wood stain when a car pulls up in the carpark and out jumps a couple of young ladies. They were from the local university and one of them was studying photography. They asked if they could do a photo shoot in the dome. So for a hour one took photos of the other in various poses in and around the dome whilst I got on with the painting.

That was Saturday. On Sunday a friend turned up with a professional quality drone and did some aerial shots of the dome and surrounding area. I was really impressed with the quality of the raw footage. Both the photographer and the drone pilot said they would send over the footage so hopefully, very soon, I should have some nice pictures and video to post on the blog.

I did manage to get the perimeter sorted out though plus I have hung the gate that has been leaning against the fence for the last year.

This is what the plot looked like before I started

2016-02-282010-05-23_zpszkymk0ew

2016-02-282010-05-12_zpsuvvwukrz

2016-02-282010-04-51_zpsqxauorlc

In between the posts and intertwined with the grass was old rusty chicken wire and a lot of rocks. The previous guy on this plot took all the stones he could find and placed them around the edge of the plot for some reason. It took some effort to rip up all the wire and dig out the grass, roots and stones but I think it looks a lot better now and will be a lot easier to maintain in the future.

2016-02-282017-01-45_zpskljzy6te

2016-02-282017-01-56_zpsjnehce3e

The plan now is to build a fence off the top of the boards so the wire will be protected from the strimmers.

The weather is becoming wet again for a few days so we will start doing more work inside the dome.

more soon


3 Comments

Started work on the Dome plot

After the flurry of activity last year to get the Dome built not much else happened on that plot because of the pressures of work and the weather and laziness. Now the weather is easing up a little it is time to start work getting the Dome plot productive.
There is a long list of things that need to be done but the main things are to get the perimeter fence built to keep out rabbits, level the ground inside and outside of the Dome, build the Aquaponics system, build the straw bail hotbeds in the Dome and insulate the northern side of the Dome.

Last weekend I started work on the Aquaponics system. We were given an IBC container but it is not ideal. I has a hole where we don’t need a hole and it used to contain styrene. It has been used for water storage for a long time so all traces of styrene have probably gone by now but I do not want to take any chances so I am going to line the IBC with a pond liner. I am building a simple IBC Aquaponics system for now but because I want to expand this later on into what’s called a CHIFT PIST system I have decided to bury the IBC in the ground. The topsoil at the allotment is quite shallow and then you get down to hard packed shale with lumps of granite so it was hard going to dig down the 700mm or so. The IBC is about a meter tall but I will be cutting the top off to form one of the grow beds plus I can remove the pallet from the bottom so I only have to go down the 700mm. I am undecided whether or not I need to insulate the fish tank from the earth or not. I think I probably will but we will see.

An IBC Aquaponics system is very simple and easy to build. It consists of a fish tank made from the bottom 800mm of an IBC container and a growbed from the top of the container flipped over. The water from the fish tank is continuously pumped up into the growbed at a steady rate which fills the bed up until it reaches the top of a siphoning stand pipe. The the water empties back into the fish tank and the whole cycle starts again. The growbed is filled with a growing medium like gravel or expanded clay pebbles and this is what your plants grow in. The growbed also has an overflow back into the fish tank just in case the siphon stops working and prevents the fish tank from being emptied which would be catastrophic for you fish. You can have problems with this system though because when the growbed or growbeds ar full there is little water in the fish tank and under certain circumstances the fish could get stressed due to lack of water. This is where the CHIFT PIST system comes in.

CHIFT PIST stands for Constant Height In Fish Tank, Pump In Sum Tank. The pump pumps the water from the sump tank into the growbeds which drain into the fish Tank which in turn overflows back into the sump tank. At all stages of the cycle the fish Tank is full so the fish never get stressed due to lack of water. Even if a pipe failed and all the water got pumped out of the sump tank the fish Tank would remain full. So this is why I am going to all the trouble of burying the IBC now. The aquaponics will be an ongoing project over the next few months but I needed to get the hole dug first. Here is the tank in the ground.

2016-02-212017-32-13_zpsns7jy6gq

All the earth removed from the hole is going to be used to level and slightly raise the floor of the dome. We will then put down a layer of weed suppressant membrane and then cover with wood chips just so we have a  tidy looking interior to the dome.

2016-02-242009-59-05_zpsgamcujkh


The next thing to go into the dome will be the straw bail hotbed. This will consist of a raised bed constructed out of 6 straw bails. The bed will be filled with fresh manure with a top dressing of compost. This will heat up and help heat the dome and will be a nice place to put our seed trays to help germination. In the summer we will plant melon and squash etc. Next winter we can then dig out the well rotted manure to use outside in the beds and replace it with fresh manure again to keep the dome heated over the winter. This is the plan anyway. As with everything I do in the garden it is a bit of an experiment.

We have done nothing to the outside area of the dome plot so that is also going to be addressed over the next few weeks. We are going to rip out the old fence and rotten posts and set scaffold boards on edge all around the perimeter. We will then build  a framework of 2 by 1 timber with wire mesh attached to keep out the rabbits. The scaffold boards will serve a couple functions. One it will stop the wire mesh from tangling with the strimmers when they cut the grass between the plots and two it will mean we can fill the plot with manure and other organic matter making a large raised bed.

So we will be progress as we find the materials. We have the the weed suppressant membrane as a local company kindly donated a massive amount of sizeable offcuts. Certainly enough to do the whole dome floor. I need need about 7 scaffold boards to do the perimeter of the plot and I have 4 so far so that should not be a problem. I am still trying to find some straw bails and a supply of fresh manure but we will get there.

more soon


10 Comments

Know Thy Enemy. Weeds. Plantain

No not the bananas!
This is another weed that I can almost guarantee you will have on your allotment or in your garden. It grows well in compacted soil so is more often seen in lawns and paths than in your beds. It can put up with a lot of abuse and seems to simply shrug off being mowed or walked upon.

Although there are over 200 species of Plantain (Plantago) in the world  I will only be discussing the two main types of Plantain common in the UK and these are Ribwort and Rat’s Tail plantain.

Ribwort (Plantago Lanceolata) has long spear like leaves with tough raised ribs running along the length of the underside. The flowers are at the end of long leafless stems and form a bullet shaped seed head surrounded by a ring of small light coloured flowers.


ribwort_600_zpsctwbjpmr

Plantago lanceolata


Rattail Plantain (Plantago Major) also known as Broad leaf or Greater Plantain produces a rosette of oval leaves with raised veins on the underside.  The flowers form along a leafless stem and look like a rat’s tail.

plantago_major_zps2vf4pz8r

Plantago major

Plantains are perennial, wind pollinated and are propagated by spreading seed. The seeds are often carried on the feet of animals and humans and this could explain why they spread along rights of way.

Plantain originated in Europe and Asia but because it is such an important healing plant it is now found all over the world. It was introduced to the Americas by the first European settlers  and quickly became established. It was so synonymous with the incomers that the indigenous  peoples called it ‘White man’s foot’ because wherever the white man walked, Plantain would soon follow. The native tribes quickly realised the benefits of Plantain and it was integrated into their own herbal traditions. Interestingly  the plant is known as ‘Englishman’s Foot’ in New Zealand. presumably for the same reason.

All parts of the Plantain are edible and the leaves and seeds have a mild mushroom taste but they are not renowned as a food although I like the taste and it does contain quite a few beneficial nutrients including Vitamins C and K, Calcium and Potassium.

Where Plantain really come into their own is as a herbal medicine.
The crushed leaves of the plantain have very good wound healing properties so are great for treating minor cuts and grazes.Tannins and Allantoin in Plantain speed up cell regeneration helping wound heal quickly.  Just chew up a couple of leaves to form a pulp poultice, place this on the wound and bandage loosely to hold poultice in place. Plantain is antibacterial, anti-inflammatory and antiseptic. It also helps draw infection, poisons and foreign bodies from the wound so is great for treating insect bites, stings and splinters. Plantain is better than Dock leaves for  treating Stinging nettle rash and can also be used to calm sun burn.

I have used Plantain to relieve the pain of toothache and is great for treating gum infections and mouth ulcers. You can chew a couple of leaves and hold it in your mouth against the problem tooth or ulcer plus you can make an infusion of the leaves in hot water, allow it to cool and use it as a mouthwash. Powdered Plantain root is also useful for toothache but if you don’t have the powdered root handy you can just dig up the root, clean it and chew it to ease the pain.

An infusion of Plantain leaves can be used to treat sore throats and acts as both a decongestant and expectorant and due to it’s antibacterial properties is great for treating a wide range of respiratory complaints.

Another area where Plantain is effective is in the treatment of  digestive disorders. A teaspoon of dried leaves made into a tea or infusion is very good for treating Diarrhoea, inflammation of the colon, IBS, stomach ulcers and is said to kill worms in the stomach and intestines. Plantain is also very effective in the treatment of Haemorrhoids so next time you think all the weeds in your garden are a pain in the butt, think again.

Up until now I have mainly talked about the benefits of using the leaves of the plantain but the seed have their uses as well. The seeds can be dried and ground into flour for making gluten free flat breads and because Plantain is rich in mucilages it can be used to thicken soups etc.
The mucilages in Plantain relieves irritation of mucous membranes by forming a protective film so helps combat the symptoms of cold and flu. It also acts as a cough suppressant especially with dry coughs. The seeds are also used to treat constipation.

Plantain really is a very powerful plant that is literally growing right under your feet. It is very easy to identify and can be found all year round. I have only just touched on a few of the wonderful things Plantain can do and I hope I have sparked enough of an interest that you will do your own research into what plantain can do for you.
I am not an expert in any sort of medicine including herbal remedies so it is important that you use your own judgement on what will work for you and if you are in any doubt please consult your Health Care Professional.


18 Comments

Building the Geodesic dome

I watched the weather on the met office website avidly from midweek hoping that Sunday would be fine with light winds. First the weather looked OK then the next day Malcolm called to ask if I really wanted to go ahead on Sunday as the weather looked really bad. On the day everything worked out fine. It was not too hot with a moderate breeze. We were good to go.

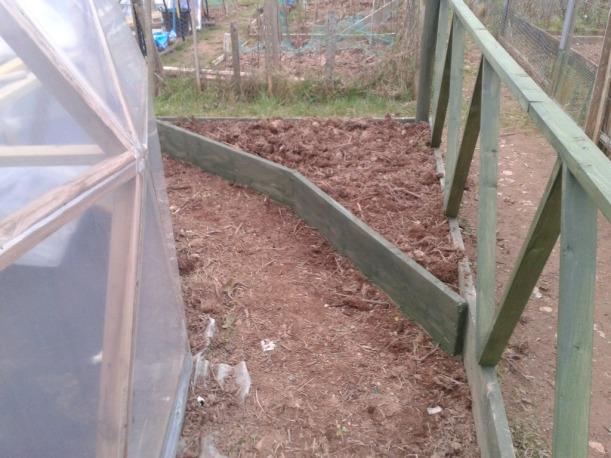
I went to work in the morning, made sure both batteries for the battery drill were charged, cut the door reveals from 12mm ply and cut some steel stakes to anchor the base to the ground then up to the site to hammer them in ready for the build in the afternoon. The ground is so hard on our allotment, the steel anchor pins burring over from the continuing assault from the lump hammer. I don’t think the dome is going to go anywhere in the wind.

Ground Anchors holding the geodesic Dome greenhouse to the ground.

Right, the stage was now set to build the dome. The base was round, level and secure. All the panels were up on site and my battery drill was charged up. Just one more thing. Back home for a full Cornish breakfast.

Back on site for about 12.30 I decided to make a start on my own. I was expecting a couple of friends to turn up around one but I couldn’t wait to get started. The first layer of the dome is alternating half hexagon and full hexagon panels. I decided to fit all the half hex panels in place first as these were easy to handle on your own. I had a bit of a shock when I tried to fit the first half panel. It was nowhere near the right shape. I screwed the fist edge to the base but the remaining edge stuck outside the ring of the base by a good 100mm. What on earth had I done wrong? I had followed the plans. If this panel was wrong then all the panels would be wrong. I grasped the wayward edge and gently eased it towards it’s intended location and to my surprise and relief it swung into place with just enough tension to make the panel nice and stiff and able to resist any wind that might suddenly blow through. I quickly fitted the remaining half panels and all behaved in the same way. The build was on.


The first panels in place for the Geodesic Dome Greenhouse

The next step is to fit the full hex panels. This should be a simple job of just clamping the the full panels to the half panels and screwing them together but nothing could be that simple. In order to give myself some wiggle room I had fitted the half panels slightly outwards from the centre of the base. The great thing about building a dome is it is built on a circle. If the panels are too tight to fit together you can move them outwards away from the centre of the circle to give yourself more space. If the panels are too loose just move them in a little. I need to learn to trust the plans and my own work and put the panels exactly where they needed to go. I repositioned the half panels so their edges lined up perfectly with the joints in the base and the full hex panels just fell into place.


First layer of full hexagon panels in place

We hold the panels tightly together with welding clamps. There is more information about all the tools you will need to build a dome like this on our Geodesic Dome page. The welding clamps are like having a spare pair of super strong hands. They allow you to securely hold a panel on place and quickly adjust the fit. They also help pull the panels tight whist screwing them together.

This is what your joints should look like.

At this point reinforcements turned up and then we progressed really quickly. It would have taken me much longer to build the dome on my own.

Malcolm and Jules got on with taping the seams on all the panels ready for them to go into the dome and Max and I carried on fitting panels.

Now starting to take shape with the help of friends

The next layer of the dome is a row of pentagon panels and this just follows the pattern of clamping, adjusting and screwing in place. I was really surprised at how quickly the build was going.

First row of pentagon panels in place.  You can see the welding clamps to the left of the door.

Next was a row of Hex panels

Just one more hex panel and the the final pentagon and we are done

Just the last pentagon to go in.

And by 3 O’Clock we were pretty much done with the main structure of the dome so it was down to the pub for a celebratory pint to thank my helpers.

And that is it for the main structure.

Back from the pub and on my own again I took my time and fitted the custom panels around the door and fitted the plywood reveals. Next job, the door and door frame.

Door reveals

And here is the finished Geodesic Dome Greenhouse.


I would like to thank Jules for putting up with my Dome obsession and helping me to achieve my goal. And of course I need to thank Max and Malcolm for their help with the building of the dome. it would have been a lot harder without you guys.

There is nothing I would change about the design of the dome as I think it is perfect but I have learned a lot during the build and I would do things a little differently on the next on.

I spent a lot of time getting the base round and level but this was unnecessary. On the next build I will attach the base boards to the the first set of panels at the workshop before they are transported to the building site. This will speed things up as the base will just go in as the first row of panels go in. This will save a lot of time. Another area that I think could be prefabricated at the workshop is the door, door frame, reveals and custom panels to each side of the door. I would then just treat this as a standard Hexagon panel that would be built into the dome as part of the first row.

Another area I am looking at is making the last row of hexagons and the final pentagon in one piece on the ground at the build site and then fitting this whole assembly in one go. This means that we can seal all the joints with polytunnel repair tape without having to climb onto the dome. this will reduce the risk of damaging the plastic with ladders etc but also ensure that the taping is to a high standard. I will have to experiment with this last one as the pane may be too heavy or unwieldy to fit in one piece.

If you would like a dome like this in your garden or allotment we are now producing them as a kit.

Please call Paul on 07796890337 to discuss options.

Thanks

Paul


6 Comments

So, what do you think?

Just a very short entry to say that with the help of some good friends Max and Malcolm and my beautiful wife Jules we managed to build the Geodesic Dome Greenhouse in just over two hours.

I still have to build thee door but we are just about there.

I need a drink

Paul

Geodesic Dome Greenhouse

I will do a proper write up but I am just too knackered at the moment.


Leave a comment

Today could be the day….

….that we build our dome!

It has been a mammoth task but all the triangle have been made, covered in plastic and assembled into hexagon and pentagon panels. The base is level and round and the weather looks like it will hold until tea time.

Hopefully the next time I write in this blog I will have a fully built dome on my allotment.

This is how it looks now

Ground Zero

Ignore all the upright stakes these are just to hold the base in place until I put the steel anchors in this morning.

Wish me luck.

paul


1 Comment

Triangles, Triangles and more Triangles

The dome is progressing nicely now although it is still slow going because I have to fit it in around work and  the weather. One of the problems has been that I have nowhere I can permanently set up my table saw and my chop saws so I have to get them out in the yard, set them up, them clean up and put them away every time I want to cut something. On the next dome I will cut all of the timber to do a whole dome to length on one day, mill the angles on one day and then put the angles on the one end of the struts in one day so I get all the machining out of the way early on. It is then easy to make up triangles whenever you have a spare moment or just devote a day to triangle making.

I now only have 34 more triangles to make and once I am set up I can make a triangle in about two and a half minutes so it doesn’t take long once you get going.

All of the timber for the remaining triangles has been cut and milled ready to go so I will get all the triangles finished this week

Wood cut and milled for the remaining triangles

.

They are in two piles as there are two different angles in each triangle so you end up with two stuts with one angle and one strut with another angle per triangle. It is not a problem unless you mix the two piles up.

Here is the triangles I have constructed so far. There are basically two types of triangle in the dome. One type makes hexagons and the other pentagons. All the pentagon triangles are made so just a few more hexagon triangles and that will be it.

Triangles so far

I will be ordering the plastic today so hopefully we will begin covering the panels next week but it all depends on the weather.

More soon

paul